A sunrise can look amazing, but photos often come out less impressive. Instinctively, we use the wide or the ultrawide to capture the scale of it. But don’t be afraid to zoom in. These shots were captured with the S24 Ultra’s 3x and 5x telephoto. They actually came out better than I was expecting.


Pen Shutter Button Tip
The pen of the Samsung S24 Ultra has a little button in the middle. With the phone on a tripod, press the button to take a photo or start and stop recording.
In photo mode, hold down the button to take a burst of photos.

Quick Open Camera Tip
To quickly open your camera, just double tap the power button.
Tap the volume button to take a photo or start recording. Hold down the volume button to take a burst of photos.

Samsung S24 Ultra - What's New?
In this post, I’ll be looking into the Samsung S24 Ultra cameras to find out how good the system is.
So what’s new? When Samsung launched the S24 Ultra back in February, they mainly focused on 2 aspects: the zoom capability and new AI features.
5x Telephoto
Firstly, the S24 Ultra comes with a new 50MP 5x telephoto camera.

Although the Galaxy S23 Ultra had a 10x zoom lens, Samsung says the new 5x lens also offers 10x zoom at the same quality thanks to the higher pixel count on the sensor.
The Galaxy S24 Ultra x5 tele features a larger pixel size compared to the Galaxy S23 Ultra, now at 1.4 μm, which is said to be 60% bigger.
AI Slow Motion
The Galaxy S24 Ultra has a new AI-powered feature called “instant slo-mo”. Rather than shooting at say 60fps and slowing to 30fps, the AI adds in those extra frames and then slows the whole thing down. Just long tap on a video in your Gallery.
The question is, does it work as well as the old traditional method?
Less Reflective Screen
I really like the screen on the S24 Ultra. According to Samsung, the Gorilla Glass Armor panel cuts back on up to 75% reflection and you definitely notice it. Of course this makes reading news and watching movies on your phone a more enjoyable experience.

But it’s also good for your photography. With less reflection, it’s easier to get the right exposure and focus.
We will look closer at these aspects as we go through. First let’s quickly run through the full camera package.
Design
I must say, it is a nice looking phone with the titanium frame and the very square screen. That said, it's a big, heavy phone with pointy corners. I thought my old Note20 Ultra was uncomfortable to hold for long, but the S24 Ultra is even more uncomfortable.

AI
AI is the new buzzword when it comes to Android smartphone cameras and Samsung has decided to join the party. What this means is that every time you take a photo, the AI enhancement kicks in and after a couple of seconds your photo is “enhanced”.
This happens, even if you take RAW photos using Pro mode. After taking a photo you will see the circling dots and then an enhancement is applied. But doesn’t this undermine the whole reason for shooting RAW in the first place?
As I dug deeper into the camera settings, I found there to be layers of post-processing (especially for photos). So while you turn one off, another is still active. But I will show you the settings I've found which control many of the AI and computational processes as we go through.
Cameras
The Samsung Galaxy S24 Ultra comes with a 200MP main camera with a f/1.7 aperture, a 12MP 13mm ultrawide camera with a f/2.2 aperture, a 10MP 3x 67mm equivalent telephoto camera and a 12MP selfie camera, so far pretty similar to the S23 Ultra.

The new telephoto is a 5x 111mm (periscope lens) with a f/3.4 aperture.
To switch camera modes, tap the mode or simply swipe the screen.
Swipe from selfie camera to shutter button to switch between front and back. If you don’t want it to do that, you can switch this off in the camera settings.

Tap on the lens picker numbers to get a row of preset zooms, so you can easily switch to the framing you want.
Tap and hold on a lens picker button to bring up the zoom slider. If you want to zoom while recording a video, you can use this slider.

Best Quality Photos
In photo mode, you can choose between 12MP, 50MP and 200MP photos.
Tap the MP button and choose the size.
In 50MP mode you can only use the main camera and the 5x telephoto.
In 200MP mode you can only use the main wide camera, obviously because it’s the 200MP sensor.
Bear in mind that to get the full number of pixels, you need to use the 4:3 aspect ratio.
 For example, in the 16:9 aspect ratio, a 200MP photo comes out at 150MP and a 50MP photo comes out at 37MP. Basically because it’s cropping the top and bottom for the 16:9 ratio.
When you look at the photos in the gallery, you might notice photos shot using the 50MP and 200MP modes have less contrast and saturation than those shot in the 12MP mode.
If you prefer the HDR look, you can try the remaster button. Open a photo and then swipe up. Tap remaster.
Best Quality Video
If you want the best quality for your videos, then open Camera Settings and tap on Advanced Video options. Make sure you have HEVC selected.
 Then below that toggle on High Bitrate videos. This will create larger files, but the video created will be less compressed and therefore contain more image information.
 I found that 30fps 4K video has a bitrate of over 95 Mbit/s compared to about 41 Mbit/s when this is switched off. So over double the quality, in bitrate terms.
8K Video
Another way to improve the quality of your video is to switch to 8K recording. The S24 Ultra can shoot 8K with the main sensor as well as the 5x sensor. Both the main wide and the telephoto 8K look pretty good, and the stabilisation works well.
In regular video mode, you can shoot 30fps 8K video, whereas in Pro Mode for video you can shoot both 24fps and 30fps.
 Normally when we’re zoomed a long way, handheld shots are hard to keep steady. But the S24 Ultra does a good job stabilising, and a gentle pan I tried came out pretty smoothly.
The caveat here is that the extra bitrate setting does not apply to the 8K footage. Instead it seems to come out at around 80 Mbit/s. Which is less than the high bitrate 4K video.
The main advantage of 8K is being able to use all those extra pixels for reframing. But there won’t be much difference in quality between 8K and high bitrate 4K.
Remaster
Go into the gallery and find a photo you want to remaster. Tap the i button or just swipe up on the screen. A remaster button should appear at the bottom.
 If you tap this, the S24 Ultra will use AI to adjust the look of the photo and hopefully improve it. After it’s finished, it gives you a before and after slider so you can decide whether it’s actually improved.
To my eyes, the after version seems to have more contrast, more brightness. It’s a bit more vibrant.
 By the way, the i in the i button stands for information. So when you tap it you will see lots of info about the photo. The size, the ISO, the camera used, the aperture and so on.
Turn Photo into Timelapse
Now when you tap this i button, sometimes you also get the option to create a 24 hr timelapse from the photo, again using AI. So it’s not really a timelapse, because it doesn’t animate anything. A real timelapse would have moving clouds, for example.
 What it does is emulate the colour changes you would get in a 24 hour cycle. From orange for sunrise, to neutral midday, to blue and then black for night. This would work better if there weren’t any clouds.
You can only use this feature when the S24 Ultra decides a photo would work well as a timelapse.
Colorise
If you tap the i button on a black and white photo, the S24 Ultra will offer to colorise it for you. Here, I used the Samsung filters to take some black and white photos. Let’s see what they look like colorised.

 It’s quite a fun effect, if you want to stylise photos. I actually like this effect, it’s a bit different to regular colour grading. Like a retro, kitsch effect.
Of course, if you have old family photos that are black and white you could upload them to your Samsung, then add colour.
 If you're curious, that's my mum on the left. Uncle Richard next to her, my grandma and then Uncle David. Grandma and David are no longer with us, so before and after has an extra meaning here. ❤️
Remove Objects
If you want to remove an object from a photo it’s pretty easy. Here I have a photo of a nice sky and silhouetted tree, but these parked cars ruin it a bit.

 Tap the edit button and then tap the button in the bottom menu, on the right, made of 4 circles.
Choose Object Eraser. You can either draw around the object or tap on it. There’s 3 vehicles I want to get rid of here, so I tapped on them all then tapped erase.

 The app will remove the objects and then use AI generative fill to replace it with something that fits the background.
Boom - gone.
Also, I don’t really like this gravel path in the bottom right corner. So I did the same again. Tapped the object and erase. It’s created grass that’s a bit darker than the other grass, but I think it’s ok.

The next photo looks nice except for these ugly electric cables going across the top. Let’s see if the S24 Ultra can remove them.
 This time I drew around them. See how it recognised the object and snapped around it.
 Tap erase and it’s gone. That’s pretty good, although the top of the church spire is slightly smudgy. But it’s certainly better than having those black lines.

Portrait Mode
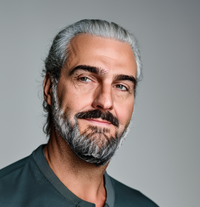
Just switching into Portrait mode and grabbing a few shots, I was impressed by how they came out. I didn’t mess with any settings or anything, just some point and shoot first tests.
 The images definitely come out looking polished and the fake background blur comes out pretty well. It’s quite accurate around the edges, around my hair and so on. But with this amount of blur, there is still quite a green screen effect, in my opinion. You know, when it looks like you’ve been photoshopped into the image.
I think these photos would look better with less background blur.
To edit the strength of the blur effect, swipe up or tap the i button. Now you should get a background effects button. Tap that to open up settings which you can edit.
 Use the slider to bring down the effect strength. So this basically means less or more blur. Another option is to change what’s in focus. If you tap the background, the focus switches to the background.
 But we can also change the effect here. For example, one called the Big Circle allows you to create a more dramatic blur. Colour Point turns the background black and white.
 Some effects allow you to change the lighting on the face. If you see this portrait icon on the right, tap it and then drag the circle within the circle to change the direction of the light on the subject’s face. You can also use the slider to change the brightness of the light.
 You can actually do this to any photo with a subject in it, it doesn’t have to be shot in portrait mode. Take a photo of someone with the main camera, tap the i button and you should find this Background effect button. At the moment, it seems that you can only add blur this way.


120fps 4K Video
The Samsung S24 Ultra can shoot 4K video at 120fps, but there’s different ways to do this.
In the regular video mode, tap the settings and you will see there’s no 120fps option. But switch to Pro Video Mode, and you will now get the 120fps 4K option. Alternatively, you can switch to Slow Motion mode and find the 120fps setting there.
 But when you open the video in the gallery it might not play back as slow motion. So we need to do a little bit of work first.
Here I'm using a 4K 120fps clip I shot using the Pro mode for video. Tap to edit and now we have an Adjust Speed setting. Tap that to open up some choices.
 To slow 120fps to 30fps we need to choose the 1/4 speed.
There’s also markers which set where the slow mo will be applied in the clip. If you want the whole clip, push these markers to each end.
 We can actually go slower than 1/4. We can go as slow as 1/16 here. And this will be extreme slow motion. Good for capturing action and real dramatic slow mo.
As well, you can use this for very smooth camera movements. I tried a handheld shot, done very quickly, but when I slowed it to 1/16 I got a nice and smooth dolly shot, almost like I was using a gimbal or something.
Selfie Camera Video
The Samsung S24 Ultra selfie camera has a 12MP sensor and can shoot 4K video up to 60fps. The quality of the camera is good, I’d say about equal to the recent iPhone selfie cameras. And a lot better than the Xiaomi selfie cameras, including the 14 Ultra.

Portrait Mode for Video
Switch to portrait for video mode and you can shoot video with a fake blurry background. This mode also works with the selfie camera, at 30fps and you can shoot 1080p or 4K resolution. I was impressed by the quality of this video, even though you can’t edit it later, like you can with the iPhone cinematic mode.
 In this mode, you can only use the selfie or the main camera. You cannot use the telephotos or the ultrawide. It does look pretty good, but masking issues remain around the edges of a subject. It still has issues with things like hair and glasses.
AI Slow Motion
Even if you don’t shoot a video in slow motion, the S24 Ultra can use AI to create it from a regular 30fps video.
First open the gallery and find a regular video. Open it and while it’s playing, tap and hold on the video. While you hold, the app uses AI to add extra frames to slow down the video. It’s pretty cool that it can do this in real time.
 When you release your finger, the video plays at normal speed again.
If you want to create a permanent slow mo effect, tap the pen button to edit the video. Now tap adjust speed and you can choose 1/2 or 1/4 speed. Move the markers left and right to place the slow motion where you want it in the clip.
 If you want the whole clip to be slow mo, then just move one marker to each end. When you’re happy tap save. You can always revert to the original, if you don’t like it.
Like with a lot of AI generated stuff, the results are a bit hit and miss. Weird glitches appear in the image sometimes. In this shot of a train, it comes out ok. But look closer at the parts that contact the overhead cable (they are actually called pantographs, if you’re curious) and you can see it gets a bit glitchy there.
Focus Enhancer
When you move the camera close to an object, you will see this symbol appear. This is the focus enhancer button. Basically, this controls how the macro works on the S24 Ultra.
 By default, the camera will switch to the ultrawide camera for close up shots. But you might find this isn’t the best quality and you get less of a bokeh background blur. Tap the button to disable it, then use the other cameras.
You might find the telephotos do the best job.

Tracking Autofocus
Open camera settings and scroll down to a setting called Tracking autofocus. If you’re shooting a video and you want to keep a particular subject in focus, enable this.
 Back in the camera, tap once on the screen on the object you want to keep in focus. A little yellow square pops up and locks onto the object. Now when the camera or the object moves, the camera will try to keep focus on that object.

RAW Photos
To capture photos in the RAW format, open camera settings and tap on Advanced Picture options. Here you can select which format the Samsung Pro Mode shoots in. If you choose RAW and JPEG then each time you take a photo you will get 2 copies, one in each format.

 Does shooting RAW mean you get better quality photos? Well, not really. What you get is the raw ingredients of a photo, which means more flexibility when working on the look of the photo in programs such as Adobe Lightroom.

Expert RAW
The S24 Ultra can shoot what Samsung calls Expert RAW. What you get is linear DNG files with 16-bit colour.
To shoot Expert RAW you will first need to download the Expert RAW app from Samsung. Go into MORE and then tap Expert RAW.
 This app gives you all kinds of options and controls, which would probably take up a whole tutorial in itself. But you can take up to 50MP photos with the main wide camera or the 5x telephoto.
Open the DNG file and you will see there’s an option to download Adobe Lightroom.
You can even take DNG photos in Lightroom, so perhaps you can use this app instead of Expert RAW. But Adobe products require a subscription if you want all the features.
Dual Record
In Dual Record mode, you can record video from 2 cameras simultaneously.
It doesn’t have to be the selfie cam and the main cam. You can select the front camera, the wide, the ultrawide and one of the telephotos.
 By tapping the camera you choose which camera is inset into the other camera. You can also choose to create 2 separate videos. Tap the switch button to switch between inset or separate.
 You can also select 1080p or 4K. So that means you can shoot 2 x 4K videos simultaneously.
Auto Framing
The Auto Framing mode crops into the frame and that cropped frame then follows you around. The result is a little bit like using the tracking feature on a gimbal, but it is obviously quite limited.
 The camera zooms in and out unpredictably sometimes. I recommend experimenting with how far the subject is from the camera, as it seemed to work better when I stood a bit further from the camera.
Intelligent Optimisation
By default, when you take a photo with your Samsung S24 Ultra, the camera does some post-processing on the photo to improve the quality. If you take a photo and quickly open it, you will see the processing taking place.
If you would prefer your camera not to add processing, you can reduce this or turn it off altogether.
 Open Camera Settings and tap on Intelligent Optimisation. You now have 3 options: Maximum, Medium (which still applies optimisation but less of it) and Minimum (which stops the camera adding any processing).
Scene Optimiser
The second setting here called Scene optimiser does seem to make a difference. Toggle this on and photos come out generally brighter and with a more HDR look. More contrast, more saturation.
 If you like your photos to look instantly more dramatic, you might want to switch this on.
Night Photos
In Night Mode your S24 Ultra will take photos with a very slow shutter. A slow shutter shutter allows more light onto the sensor. How slow the shutter is will depend on how dark it is and how steady the camera is.
Holding the camera in your hands, Night Mode will use something like a 2 second shutter. Once the camera is on a tripod, the shutter can be much slower.

 You can leave it in auto mode, so the camera sets the shutter speed.
Or you can set it to Max, in which case the longest shutter speed will be used. Holding it in my hand, this max setting is about 5 seconds. But on a tripod, it goes up to 13 or 14 seconds. You can see it adjusting to the conditions.
 This mode gives you photos that don’t necessarily reflect how the scene looks to your eyes. Often it will turn a night scene into almost a daylight scene. The longer the shutter speed, the brighter it will look.
 Of course any movement is going to be blurred by the slow shutter. This can look pretty cool with things like car headlamps causing streaks.
Camera Assistant
A number of settings are located within the Samsung Camera Assistant app, which is different to the regular Samsung camera app. If you don’t have it installed, you can get it from the Galaxy Store.
You can open the Camera Assistant app directly, or via the Camera settings. Scroll down to find the Camera Assistant heading.


Zoom Shortcuts
Here you can choose which zoom shortcuts appear among the lens picker buttons. By default you will have the 10x zoom, which normally uses the 5x telephoto and adds a 2x zoom.
Here you can add a 2x and a 100x zoom as well. Or choose the combination you prefer.
Picture Softening
The Picture Softening setting is to do with the sharpness of images. If you find your images are too sharp you can reduce the sharpness here. High would be the least sharp setting.
Auto Lens Switching
If you prefer to keep control of when your camera switches lenses, toggle this off. Otherwise, the camera will decide which lens and which sensor is best. For example, you might want to use the 5x telephoto, but if the camera thinks it’s too dark it will use the main sensor and zoom in.
Personally, I prefer to control which camera I am using. Different lenses have different characters, so I want to choose the lens most appropriate for the shot I’m getting.
Distortion Correction
Toggle on Distortion Correction if you want to remove the curved lines you get from wide angle lenses. For me, this is a creative choice. So I might choose to switch this off if I want to keep those curved lines for creative reasons.
High Resolution Settings
These 2 settings are to do with photo resolution.
Adaptive pixel uses multiple frames in low light and then combines them to create a higher quality photo. But I found that whether this was on or off, the S24 Ultra adds post processing after taking a photo - if Quality Optimisation is switched on.
Upscale digital zoom will use a post process to remove the artefacts you get when you zoom in a long way. Again, whether this is on or off, the S24 Ultra adds post processing - if Quality Optimisation is switched on.

DoF Adapter correction
Toggle on DoF adapter correction if you’re using a DoF adapter. I’m sure very few people will need this, but all it does is flip the image upside down. Because DoF adapters flip the image, so you need to flip it back.
Anamorphic lens correction
If you’re using an anamorphic conversion lens, you can de-squeeze it using this setting. This setting supports both 1.33x and 1.55x.
Audio Monitoring
Toggle on Audio monitoring if you want to be able to monitor audio while you’re using external microphones.
Camera timeout
Here you can adjust how long the screen stays on when the camera app is open and there’s no activity. By default it’s set to 2 minutes. You can set this up to 10 minutes.
Dim screen while recording
If you are recording long video clips, you can save the battery by dimming the screen while you are recording. You can set the screen to dim after 1 minute of no activity, up to 10 minutes.
Clean Preview
Finally, if you are using an HDMI display connected to your Samsung for monitoring purposes, you can toggle this on to remove the interface and you’ll get a clean image output.
That's it for this post. Happy creating!
Simon